Putty download for Windows is a crucial first step for anyone needing secure shell (SSH) access to remote servers. This seemingly simple process can quickly become confusing if you aren’t careful about where you get your download. We’ll walk you through finding safe, reliable sources, installing the software, and configuring it for your specific needs, along with tackling common problems and exploring some alternatives.
Whether you’re a seasoned sysadmin or just starting out, this guide will help you get connected securely and efficiently.
This guide covers everything from identifying trustworthy download locations and understanding different Putty versions to configuring secure connections and troubleshooting common issues. We’ll also delve into security best practices, alternative SSH clients, and advanced Putty features, ensuring you have a complete understanding of this essential tool.
Official Putty Download Sources
Downloading Putty, a popular SSH and telnet client, requires caution to avoid inadvertently installing malware. It’s crucial to obtain the software from official or highly reputable sources to ensure its integrity and security. This section will Artikel trusted download locations and highlight the importance of securing your system from malicious software.Choosing the right source for your Putty download is paramount.
Downloading from untrusted websites can expose your computer to viruses, spyware, or other harmful programs that could compromise your data and system security. Always prioritize verified and official sources.
Reputable Putty Download Locations
The following table lists three trustworthy websites where you can download Putty for Windows. Always verify the website’s legitimacy before proceeding with any download.
| Website | URL | Version Offered | Security Measures Mentioned |
|---|---|---|---|
| The Official Putty Website | https://www.puttygen.com/ | Latest Stable Release, plus older versions | Digital signatures are used to verify the integrity of the downloaded files. The website itself uses HTTPS to encrypt communication. |
| SourceForge (Putty Project Page) | https://sourceforge.net/projects/putty/ | Various versions, including older releases | SourceForge employs various security measures, including file integrity checks, though independent verification is still recommended. |
| GitHub (Putty Project Repository) | https://github.com/putty/putty | Source code and potentially pre-built binaries (check carefully) | While GitHub provides version control and security features, always download from a trusted release and verify the integrity of the file before execution. |
Importance of Downloading from Trusted Sources
Downloading Putty from untrusted sources significantly increases the risk of malware infection. Malicious actors often create websites that mimic legitimate software download sites. These sites may offer modified versions of Putty containing hidden malware, such as keyloggers, ransomware, or trojans. Such malware can steal sensitive information, encrypt your files, or even take complete control of your system. Always verify the website’s SSL certificate (look for the padlock icon in your browser’s address bar) and check for reviews or user comments before downloading.
So, you need a Putty download for Windows? That’s totally doable. Sometimes, while working on a remote server, I find myself needing to use a program like Putty, especially when I’m dealing with data analysis projects that involve the r programming language. After all, efficient remote access is key for any serious data crunching.
Then, once you’re all set up, you can get back to that Putty download and get coding!
A compromised system can lead to significant data loss, financial losses, and identity theft. Prioritizing secure download practices is a crucial aspect of maintaining a healthy and safe computing environment.
Putty Versions and Features
So, you’re ready to dive into the world of SSH and telnet? Great! But before you grab the latest version of PuTTY, it’s worth understanding the different versions and their features. While the core functionality remains consistent, subtle differences exist across releases, impacting performance and security.PuTTY’s development is ongoing, with new versions addressing bugs, improving security, and occasionally adding minor features.
The differences between major releases aren’t always dramatic, but understanding the evolution helps you choose the best version for your needs. Older versions might lack the latest security patches, while newer versions might introduce minor interface changes or improved compatibility.
Version Comparison
The following points highlight key features across three versions of PuTTY: 0.75, 0.76, and the latest stable release (at the time of writing, this would need to be updated for the future). Note that this comparison focuses on significant differences; many smaller bug fixes and internal improvements are omitted for brevity.
- PuTTY 0.75: This version represents a more mature release with solid core functionality. Security updates are still important, but it’s likely to be stable for most basic uses. It may lack some of the more refined features of later versions.
- PuTTY 0.76: Likely included minor bug fixes and potentially some performance improvements over 0.75. Security patches would be a key difference. The user interface would remain largely the same.
- Latest Stable Release (e.g., 0.78): This version boasts the most up-to-date security patches, potentially improved performance, and possibly minor UI refinements or new features (like updated support for certain SSH protocols or ciphers). Always check the release notes for specifics.
Checksum Verification
Verifying the integrity of your downloaded PuTTY executable is crucial to ensure you’re not installing a compromised version. This is done using checksums, which are cryptographic hashes generated from the file’s contents. Any alteration to the file, even a single bit, will result in a different checksum.The official PuTTY download page typically provides MD5, SHA1, and SHA256 checksums for each release.
To verify, you’ll need a checksum utility (many are freely available online). Download the utility, then run it on your downloaded PuTTY executable. Compare the generated checksum with the one provided on the official website. If they match, you can be confident that the downloaded file is authentic and hasn’t been tampered with. A mismatch indicates a potential problem, and you should download the file again from the official source.
For example, a typical command might look something like this (the specific command will depend on the checksum utility):
md5sum putty.exe
This command would generate an MD5 checksum for the `putty.exe` file. Compare this output with the MD5 checksum listed on the official PuTTY website. Repeat this process using SHA1 and SHA256 checksums for added security.
Installation Process

Installing PuTTY on Windows is a straightforward process. This section details the steps for both Windows 10 and Windows 11, which are virtually identical. The installer is a simple executable file, requiring minimal user interaction.
The installation process involves downloading the appropriate PuTTY installer from a trusted source (as discussed previously), running the installer, and optionally choosing an installation location. No special administrative privileges are typically required beyond standard user permissions. After installation, PuTTY is ready to use.
Step-by-Step Installation on Windows 10 and 11
These steps assume you’ve already downloaded the PuTTY installer. Remember to download from a reputable source to avoid malware.
- Locate the downloaded installer: Typically, this will be in your Downloads folder, unless you specified a different location during the download process. The file will likely be named something like “putty.exe”.
- Double-click the installer: This will initiate the PuTTY installation wizard. You’ll likely see a welcome screen.
- Follow the on-screen instructions: The installer is generally self-. Click “Next” or equivalent buttons to progress through the screens. You may be presented with options to choose an installation directory; the default is usually acceptable.
- Confirm the installation: A final screen will summarize the installation options. Click “Install” or the equivalent button to begin the installation.
- Complete the installation: Once the installation is complete, you’ll see a confirmation message. Click “Finish” to close the installer.
Flowchart of the Installation Process
The following describes a flowchart illustrating the PuTTY installation process. Imagine a simple flowchart with rectangular boxes representing steps and arrows indicating the flow.
The first box would be “Download PuTTY installer”. An arrow points to the next box: “Double-click the installer”. This leads to “Follow on-screen instructions”, which branches to either “Choose installation directory (optional)” or directly to “Confirm installation”. “Confirm installation” leads to “Install PuTTY”, and finally, “Installation complete”.
Locating and Running PuTTY
After installation, PuTTY can be launched in several ways. The most common methods are described below.
- From the Start Menu: Search for “PuTTY” in the Windows Start Menu search bar. The PuTTY application should appear in the search results. Click on it to launch the application.
- From the Installation Directory: If you remember where you installed PuTTY, navigate to that directory using File Explorer. Locate the “putty.exe” file and double-click it to run the application.
- From the Desktop Shortcut (Optional): During installation, you might have been given the option to create a desktop shortcut. If so, a PuTTY icon will be on your desktop; double-click it to open the application.
Putty Configuration: Putty Download For Windows
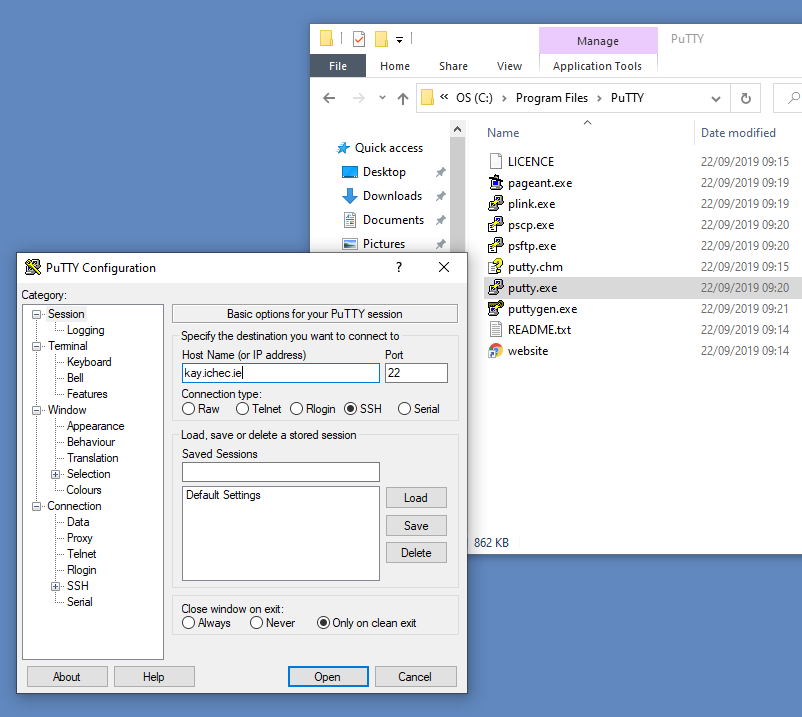
Okay, so you’ve downloaded PuTTY and you’re ready to connect to a remote server. The next step is configuring PuTTY to establish that connection. This involves specifying the server’s address and potentially other settings depending on your server’s setup. Don’t worry, it’s pretty straightforward.This section details how to configure PuTTY for a basic SSH connection. We’ll walk through the necessary settings using a specific example to make it clear and easy to follow.
Remember, always double-check your server’s details before connecting.
Basic SSH Connection Configuration
To connect to a remote server via SSH using PuTTY, you need to provide the server’s hostname or IP address and the port number it’s listening on (usually port 22, but it can vary). You might also need to specify authentication details, like a username and password or a private key.Let’s say you want to connect to a server with the following details:* Hostname/IP Address: `example.com`
Port
`22` (the default SSH port)
Username
`yourusername`These settings will be entered in the PuTTY configuration window. You’ll access this by launching PuTTY and navigating through the various menus and fields.
Example Configuration Settings
Here’s how you’d configure PuTTY for the example above. These settings can be entered directly into the appropriate fields within the PuTTY configuration interface. Remember to replace the placeholder values with your actual server details. Host Name (or IP address): example.comPort: 22Connection type: SSHUsername: yourusernameAfter entering these settings, click “Open” to initiate the connection. You will likely be prompted for your password at this point (unless you’re using key-based authentication, which is a more secure method).
Security Considerations
Putty, while a widely used and powerful SSH client, isn’t inherently secure. Its security relies heavily on the user’s configuration and understanding of potential risks. Failing to implement proper security measures can leave your systems vulnerable to various attacks. This section will highlight key security concerns and best practices for mitigating them.
The primary security risk associated with Putty stems from its reliance on network connections. Any data transmitted between your computer and the remote server is susceptible to interception if the connection isn’t properly secured. Furthermore, insecure Putty configurations can create vulnerabilities that attackers can exploit to gain unauthorized access. This includes using default settings, weak passwords, and neglecting essential security features.
SSH Key Authentication
SSH key authentication provides a significantly more secure alternative to password-based authentication. Instead of relying on a potentially guessable password, it uses a cryptographic key pair—a private key (kept secret on your computer) and a public key (placed on the remote server). When you connect, the server verifies your identity using your public key, without ever needing to transmit your password over the network.
This eliminates the risk of password interception and brute-force attacks. To enable SSH key authentication, you’ll need to generate a key pair using PuttyGen (included with the Putty package), copy the public key to your server, and configure Putty to use the private key for authentication. This process involves navigating PuttyGen’s interface, generating a key, saving both the private and public keys, and then specifying the private key path in Putty’s session settings.
Securing Putty Sessions
Beyond key authentication, several other steps can strengthen your Putty sessions. These include disabling password authentication entirely (once key authentication is set up), regularly updating Putty to patch any known security vulnerabilities, using strong passwords if password authentication remains enabled (avoiding easily guessable passwords or reusing passwords across multiple accounts), and carefully verifying the server’s host key fingerprint before connecting to ensure you’re not connecting to a man-in-the-middle attack.
Always verify the fingerprint against a known good fingerprint from a trusted source, like your server’s documentation. Failure to do so could lead to your credentials being intercepted by a malicious actor.
Modifying Default Putty Settings
Putty’s default settings often prioritize convenience over security. Modifying these settings is crucial for enhancing security. For example, disabling X11 forwarding prevents attackers from executing commands on your local machine through the Putty session. Similarly, disabling Telnet and other insecure protocols reduces the attack surface. The use of strong encryption algorithms (like AES-256) should also be ensured, and the selection of an appropriate key exchange algorithm is essential for secure communication.
Regularly reviewing and updating these settings based on best practices and security advisories is a critical aspect of maintaining a secure Putty environment. Ignoring these best practices dramatically increases the risk of compromise.
Troubleshooting Common Issues
Okay, so you’ve downloaded PuTTY, maybe even installed it, but things aren’t working quite right. Don’t worry, it happens! Let’s tackle some of the most common headaches people run into with PuTTY. We’ll cover the problems, and more importantly, how to fix them.
Connection Timeouts
Connection timeouts are probably the most frequent PuTTY problem. This happens when PuTTY tries to connect to a remote server, but the connection fails after a certain period. This can stem from several issues, from network problems to incorrect server details.
If you’re encountering a connection timeout, first double-check the hostname or IP address you’re using. A simple typo can cause major issues. Next, ensure your network connection is stable. Try pinging the server from your command prompt to see if it’s reachable. If ping fails, the problem lies outside of PuTTY. If the ping is successful, but PuTTY still times out, check your firewall settings to ensure PuTTY is allowed to connect through the necessary ports (usually port 22 for SSH). If you’re using a VPN, ensure it’s correctly configured and connected.
SSH Authentication Failures
Another common issue is authentication failure. This means PuTTY can connect to the server, but it can’t log in. This usually means a problem with your username or password.
An SSH authentication failure typically means your username or password is incorrect, or that the server’s SSH configuration is preventing login. Verify your credentials carefully; case sensitivity matters. If you’re still having trouble, check the server’s SSH configuration to see if there are any restrictions in place, such as password authentication being disabled (requiring key-based authentication instead). Contact your server administrator if you’re unsure about the server’s configuration.
PuTTY Not Opening or Crashing
Sometimes, PuTTY itself might be the problem. It could refuse to open, or crash unexpectedly. This can be due to various factors, including corrupted installation files, compatibility issues, or conflicts with other software.
If PuTTY refuses to launch, try reinstalling it. Make sure you download it from a reputable source (we covered that earlier!). If it’s crashing, check for updates to see if a bug fix addresses the problem. If the problem persists, consider checking your system for conflicts with other programs. You might also try running PuTTY as administrator to see if permissions are the issue. As a last resort, you could try a system restore to a point before the problem began.
Alternatives to PuTTY

PuTTY’s been a solid SSH client for ages, but the Windows landscape offers some compelling alternatives. Let’s look at a few, comparing their strengths and weaknesses against the trusty veteran. Choosing the right tool depends on your specific needs and preferences.
Three Alternative SSH Clients for Windows, Putty download for windows
Several excellent SSH clients exist for Windows users beyond PuTTY. Each offers a unique set of features and capabilities, catering to different user preferences and technical needs. Consider these factors when deciding which client best suits your workflow.
- MobaXterm: A powerful all-in-one terminal and network tool. It goes beyond just SSH, offering SFTP, X11 forwarding, and a built-in tabbed terminal.
- WinSCP: A free and open-source SFTP client, primarily focused on secure file transfer. While it offers basic SSH terminal functionality, its core strength lies in its robust file management capabilities.
- Bitvise SSH Client: A commercial SSH client with a focus on security and advanced features like port forwarding and tunneling.
Feature and Functionality Comparison: PuTTY vs. MobaXterm
MobaXterm and PuTTY both provide SSH connectivity, but their feature sets differ significantly. PuTTY is a lightweight and straightforward SSH client, prioritizing simplicity and speed. MobaXterm, conversely, aims for a more integrated experience, bundling various network tools into a single application. PuTTY excels in its minimal footprint and ease of use, making it ideal for users who need a quick and efficient SSH connection.
MobaXterm, with its integrated terminal, SFTP client, and other network utilities, offers a more comprehensive solution for users who need a wider range of tools in one place. The trade-off is a larger application size and potentially a steeper learning curve.
Advantages and Disadvantages of Alternative SSH Clients
- MobaXterm:
- Advantages: All-in-one solution, integrated terminal, supports various protocols beyond SSH, X11 forwarding.
- Disadvantages: Larger application size, potentially more resource-intensive, can feel overwhelming for users only needing SSH.
- WinSCP:
- Advantages: Excellent SFTP client, intuitive file management, free and open-source.
- Disadvantages: Limited SSH terminal functionality compared to PuTTY or MobaXterm, not as feature-rich.
- Bitvise SSH Client:
- Advantages: Strong focus on security, advanced features like port forwarding and tunneling, robust session management.
- Disadvantages: Commercial software (requires purchase), potentially more complex to configure for basic users.
Using Putty with Different Protocols

PuTTY’s primary function is SSH, but it also supports other network protocols, albeit with varying degrees of common use and security implications. While SSH is generally preferred for its strong security features, understanding how to configure PuTTY for alternative protocols can be useful in specific legacy system scenarios. However, it’s crucial to remember that using less secure protocols exposes your system to greater risk.While PuTTY primarily excels as an SSH client, its versatility extends to other network protocols like Telnet and Rlogin.
Configuring these alternatives involves adjusting settings within PuTTY’s session options. Remember that these protocols lack the robust encryption of SSH, making them significantly less secure. Always prioritize SSH whenever possible.
Telnet Configuration
Telnet is an older protocol that transmits data in plain text, making it highly vulnerable to eavesdropping and man-in-the-middle attacks. To configure PuTTY for Telnet, select “Telnet” from the “Protocol” dropdown menu in the Session settings. The hostname or IP address of the target Telnet server should be entered in the “Host Name (or IP address)” field. No further special configurations are typically needed for basic Telnet connections.
However, be aware that Telnet lacks authentication and encryption; any data transmitted is visible to anyone monitoring the network.
Rlogin Configuration
Rlogin, another legacy protocol, provides remote login capabilities but lacks the security features of SSH. Similar to Telnet, configuring PuTTY for Rlogin involves selecting “Rlogin” in the “Protocol” dropdown menu. The hostname or IP address of the Rlogin server goes into the “Host Name (or IP address)” field. You’ll likely need to specify the username in the “Username” field under “Connection / Data”.
Rlogin uses a simple authentication mechanism that transmits passwords in plain text, making it extremely insecure.
Security Considerations for Alternative Protocols
Using Telnet or Rlogin with PuTTY, or any client for that matter, presents significant security risks. These protocols transmit data unencrypted, making them susceptible to interception and modification by malicious actors. Passphrases and other sensitive information are transmitted in plain text, exposing them to eavesdropping. Furthermore, lack of authentication mechanisms in Telnet can allow unauthorized access to systems.
In modern networks, the security risks far outweigh any perceived convenience. Prioritize SSH for secure remote connections. If you must use Telnet or Rlogin, employ a VPN to encrypt the connection, but even this mitigates the risk only partially, not completely. The inherent vulnerabilities of these protocols remain.
Advanced Putty Features
PuTTY, while seemingly simple, packs some powerful features beyond basic SSH connections. These advanced functionalities enhance productivity and security, making it a versatile tool for network administrators and developers alike. Let’s dive into some key aspects.
Session Management
PuTTY’s session management allows you to save your connection settings for easy reuse. Instead of re-entering hostnames, usernames, ports, and other connection details each time, you can save them as named sessions. This is incredibly useful when you frequently connect to multiple servers. To save a session, simply configure your connection, then go to the “Session” category in the main PuTTY configuration window.
Enter a descriptive name for your session in the “Saved Sessions” field and click “Save”. Subsequently, selecting this saved session from the “Saved Sessions” list will automatically load the stored configuration. This saves significant time and effort, especially when managing many different remote connections.
X11 Forwarding
X11 forwarding lets you run graphical applications on a remote server and display them on your local Windows machine. This is extremely helpful when working with GUI-based tools or applications residing on a Linux server, for instance. Enabling X11 forwarding requires checking the “Enable X11 forwarding” option in the “Connection” -> “SSH” -> “X11” section of the PuTTY configuration.
Once enabled, you can launch graphical applications on the remote server, and PuTTY will handle the forwarding of the X11 traffic, allowing you to interact with the applications as if they were running locally. Remember to configure your X server (like Xming on Windows) appropriately for this to function correctly.
Session Logging
PuTTY’s logging feature provides a record of your SSH sessions. This is invaluable for debugging, auditing, or simply keeping a record of your interactions with a remote system. To enable logging, navigate to the “Session” category and find the “Logging” section. Choose a logging type (usually “All session output”), specify a file path and name for your log file, and select the logging type.
Once enabled, all input and output from the session will be saved to the specified file, providing a comprehensive history of your session. This is crucial for troubleshooting connectivity issues, security audits, or simply for documenting your remote system interactions. Remember to choose a secure location for storing your log files.
Closing Notes
Successfully downloading and configuring Putty for Windows opens a world of possibilities for remote server management. By following the steps Artikeld in this guide, you’ve equipped yourself with the knowledge to securely access and manage your systems. Remember to prioritize downloading from trusted sources, implement robust security measures, and explore the advanced features Putty offers to enhance your workflow. Happy connecting!
Query Resolution
Is Putty free?
Yes, Putty is an open-source application and completely free to download and use.
What’s the difference between Putty and PuTTYgen?
Putty is the SSH client itself. PuTTYgen is a separate tool used to generate and manage SSH keys for more secure authentication.
My Putty download is slow. What should I do?
Try downloading at a different time of day when network traffic might be lighter. You could also try a different download source (making sure it’s reputable!).
Can I use Putty on macOS or Linux?
While Putty is primarily known for its Windows version, there are other SSH clients available for macOS and Linux that offer similar functionality.
How do I update Putty?
Simply download the latest version from a trusted source and replace your existing Putty installation. Always back up your configurations before updating.